Introduction
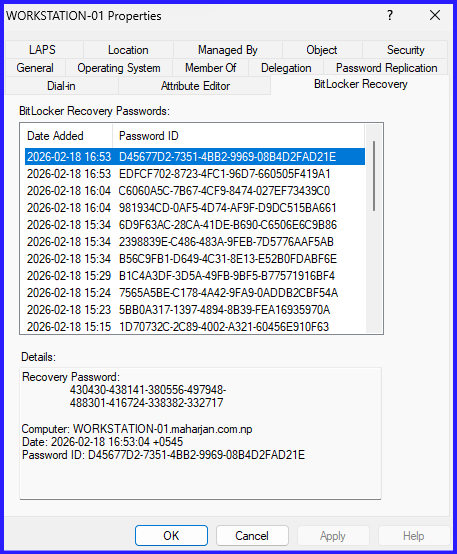
Over time, a single computer object in Active Directory can accumulate multiple BitLocker recovery GUIDs. This happens during OS reinstalls, manual decryption/re-encryption cycles, or when “Backup to AD” policies trigger multiple times.
From a security and management perspective, having five different recovery keys for one C: drive is a recipe for disaster. Cleaning these up manually via the Active Directory Users and Computers (ADUC) GUI is tedious. PowerShell allows us to filter, identify, and remove these redundant objects efficiently.
Configuration: The PowerShell Approach
To manage these objects, you need the Active Directory and BitLocker modules installed. Ensure you are running PowerShell as an Administrator with appropriate permissions to delete child objects in the target Organizational Unit (OU).
1. Identifying Multiple Recovery Passwords
First, let’s see which computers more than one recovery password have stored.
# Find computers with multiple BitLocker recovery objects
$Computers = Get-ADComputer -Filter * -SearchBase "CN=WORKSTATION-01,OU=DESKTOPS,OU=Computers,OU=MAHARJAN-NP,DC=maharjan,DC=com,DC=np"
foreach ($Computer in $Computers) {
    $RecoveryObjects = Get-ADObject -Filter "objectClass -eq 'msFVE-RecoveryInformation'" -SearchBase $Computer.DistinguishedName
    if ($RecoveryObjects.Count -gt 1) {
        Write-Host "Computer $($Computer.Name) has $($RecoveryObjects.Count) recovery keys." -ForegroundColor Yellow
    }
}
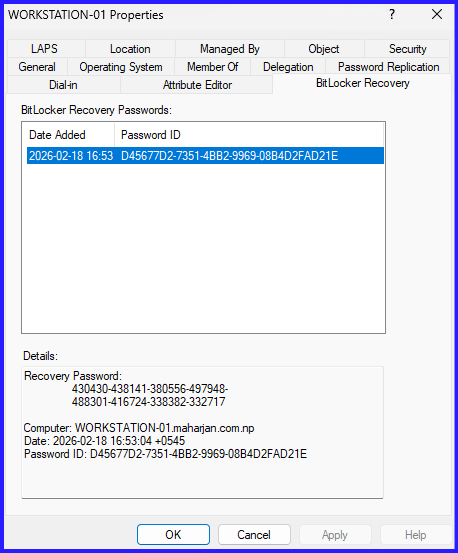
2. Keeping Only the Most Recent Key
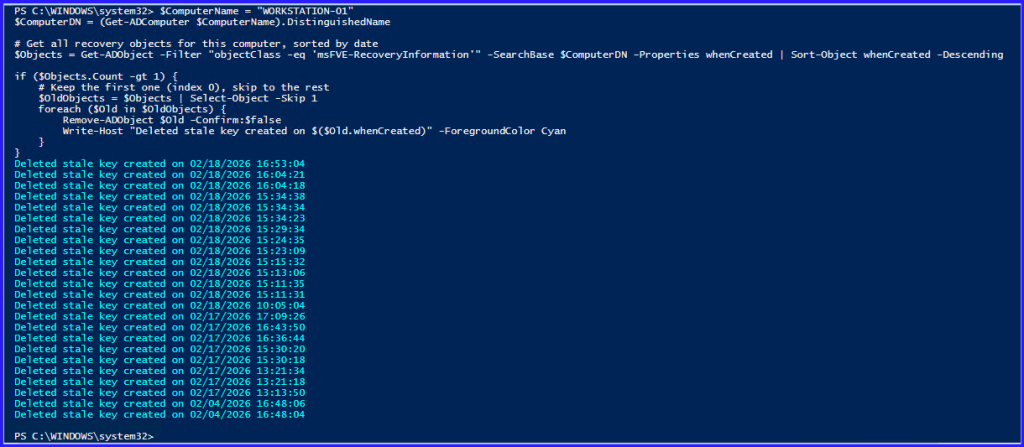
This is the most common requirement. We sort the recovery objects by their whenCreated attribute and delete everything except the newest one.
$ComputerName = "WORKSTATION-01"
$ComputerDN = (Get-ADComputer $ComputerName).DistinguishedName

# Get all recovery objects for this computer, sorted by date
$Objects = Get-ADObject -Filter "objectClass -eq 'msFVE-RecoveryInformation'" -SearchBase $ComputerDN -Properties whenCreated | Sort-Object whenCreated -Descending

if ($Objects.Count -gt 1) {
    # Keep the first one (index 0), skip to the rest
    $OldObjects = $Objects | Select-Object -Skip 1
    foreach ($Old in $OldObjects) {
        Remove-ADObject $Old -Confirm:$false
        Write-Host "Deleted stale key created on $($Old.whenCreated)" -ForegroundColor Cyan
    }
}
3. Backup BitLocker Recovery Password
# 1. Configuration - Set your export path
$ReportPath = "$HOME\Desktop\AD_BitLocker_Master_Report.html"

# 2. Fetch all BitLocker Recovery Objects from AD
Write-Host "Querying Active Directory for all BitLocker recovery keys..." -ForegroundColor Cyan

$BitLockerData = Get-ADObject -Filter "objectClass -eq 'msFVE-RecoveryInformation'" -Properties msFVE-RecoveryPassword, whenCreated | ForEach-Object {

    # Extract the parent computer's Distinguished Name
    $ParentDN = $_.DistinguishedName -replace '^CN=[^,]+,'

    # Get the Computer Name from the parent object
    try {
        $Computer = Get-ADComputer -Identity $ParentDN -Properties OperatingSystem
        $ComputerName = $Computer.Name
        $OS = $Computer.OperatingSystem
    } catch {
        $ComputerName = "Deleted/Unknown Computer"
        $OS = "N/A"
    }

    [PSCustomObject]@{
        ComputerName     = $ComputerName
        OperatingSystem  = $OS
        RecoveryPassword = $_.'msFVE-RecoveryPassword'
        DateCreated      = $_.whenCreated
    }
}

# 3. Define HTML Styling (CSS)
$Header = @"
<style>
    body { font-family: 'Segoe UI', Tahoma, Geneva, Verdana, sans-serif; background-color: #f0f2f5; padding: 30px; }
    h2 { color: #1a5276; text-align: center; border-bottom: 2px solid #1a5276; padding-bottom: 10px; }
    table { width: 100%; border-collapse: collapse; background-color: white; box-shadow: 0 5px 15px rgba(0,0,0,0.1); }
    th { background-color: #1a5276; color: white; padding: 15px; text-align: left; text-transform: uppercase; font-size: 14px; }
    td { border: 1px solid #dee2e6; padding: 12px; font-size: 14px; vertical-align: middle; }
    .pwd { font-family: 'Consolas', monospace; color: #c0392b; font-weight: bold; letter-spacing: 1px; }
    tr:nth-child(even) { background-color: #f8f9fa; }
    tr:hover { background-color: #eaf2f8; }
    .footer { margin-top: 20px; font-size: 12px; color: #7f8c8d; text-align: right; }
</style>
<h2>Enterprise BitLocker Recovery Report</h2>
<p><strong>Total Keys Found:</strong> $($BitLockerData.Count)</p>
<p><strong>Generated on:</strong> $(Get-Date)</p>
"@

# 4. Convert and Export
if ($BitLockerData) {
    $BitLockerData | Select-Object ComputerName, OperatingSystem, @{N='RecoveryPassword';E={$_.RecoveryPassword}}, DateCreated |
    ConvertTo-Html -Head $Header -PostContent "<div class='footer'>Confidential - Internal Use Only</div>" |
    Out-File $ReportPath

    Write-Host "Export Complete! File saved to: $ReportPath" -ForegroundColor Green
} else {
    Write-Warning "No BitLocker recovery information found in Active Directory."
}
Save it as Backup-BitLockerrecoverypassword-allpcs.ps1
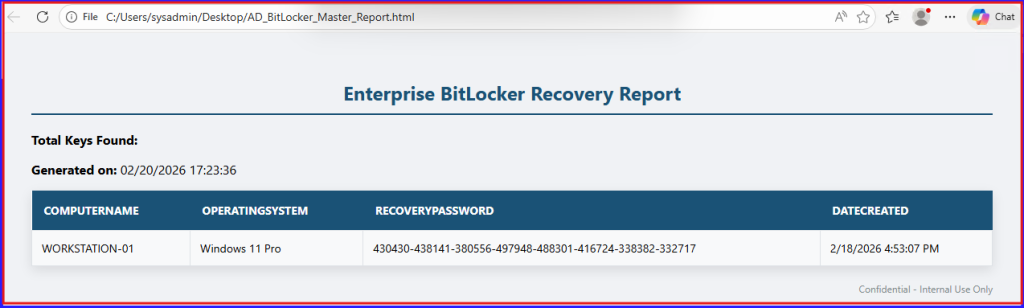
Report Results Exported into HTML Format:
Summary
Managing BitLocker recovery information involves moving beyond manual file-saving to a centralized, automated architecture. While BitLocker can save a recovery text file locally, the most robust method is escrowing the 48-digit numerical password directly into Active Directory. This ensures recovery information remains tied to the computer object even if physical media is lost. For environments with aging records, using PowerShell to clean up stale passwords is vital to maintain a “single source of truth.”
Final Thought
Ultimately, PowerShell serves as the bridge between raw data and actionable documentation. Exporting recovery data into a styled HTML format provides a searchable interface for audits or migration preparation. This approach secures the recovery path for workstations and servers while providing a structured safety net during major system upgrades, where verifying key backups is a prerequisite for success.